Showing posts with label SSRS. Show all posts

Tuesday, April 5, 2016

DataZen Style KPIs in a Reporting Services 2012 Report

Last weekend I attended SQL Saturday in Orange County where I sat in on a number of sessions regarding how Microsoft's acquisition of DataZen is being incorporated into SQL Server 2016 Reporting Services and Power BI. I had seen the DataZen visualizations in the past and had really liked how they displayed KPIs.


DataZen KPIs

There is now an option to create these DataZen KPIs in the SQL Server 2016 Reporting Services web portal (however, not necessarily in a "paginated" report). 


SQL Server 2016 Reporting Services Web Portal

I like the KPIs because they display information in a very concise manner with the ability to show, for example, volume, a comparison to a target, whether performance is good or bad via color and some form of trend line. 

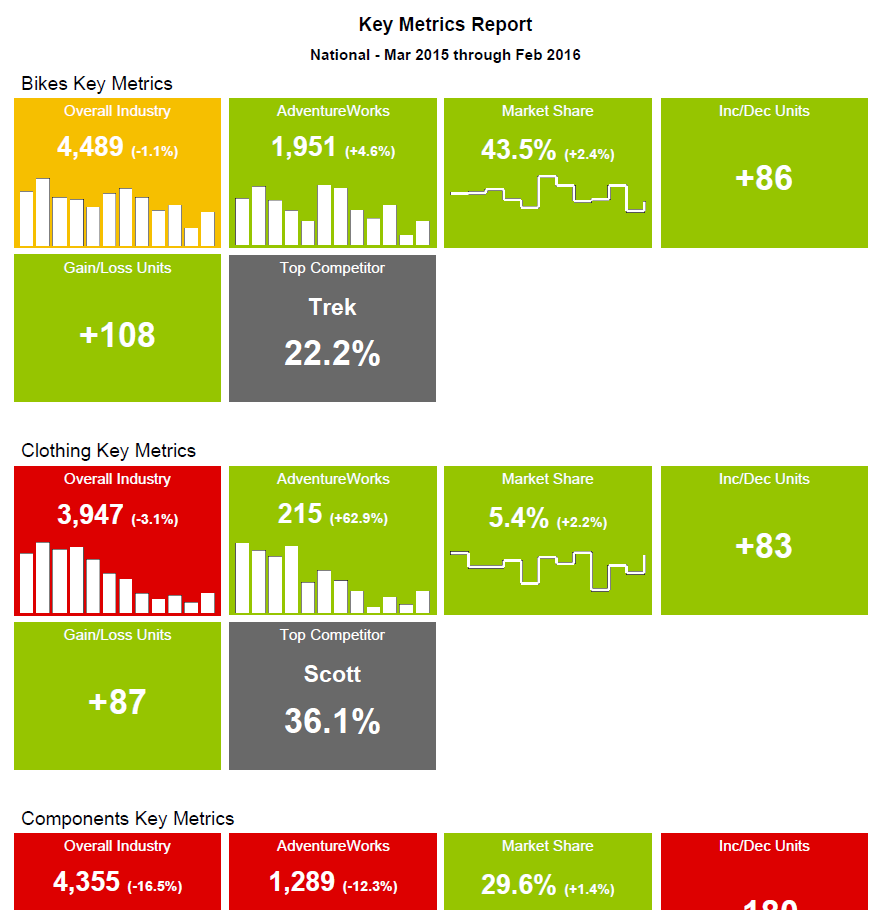
In fact, I liked them so much, I decided to try to replicate them in a Reporting Services report using SQL Server 2012. The DataZen KPI style ended up being fairly simple to reproduce by using a List with some Rectangles, Text Boxes and Sparklines. Add a couple of MDX queries with some business logic, and I was able produce the report below (note that this isn't really AdventureWorks data).


DataZen Style KPIs in a Reporting Services Report

There's nothing groundbreaking here, just an idea for implementing an effective visualization in a Reporting Services report.

Sunday, November 23, 2014

SSRS: Filling in Cells of Reports Exported to Excel (Part 2)

In my last post, SSRS: Filling in Cells of Reports Exported to Excel (Part 1), I showed how to fill in the cells of a block formatted report that has been exported to Excel. In this post we'll do the same thing for a stepped formatted report.

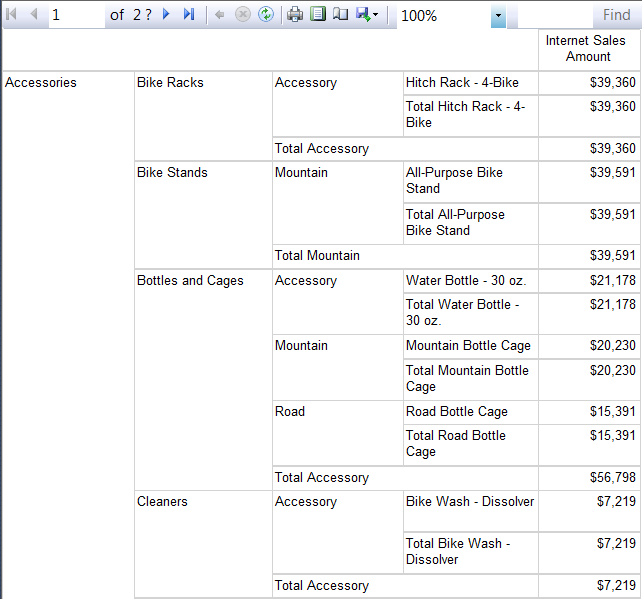
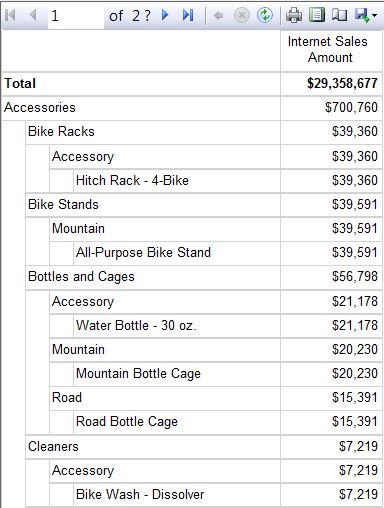
A stepped format displays row groups in staggered columns as in the example below:


Multi-column stepped format SSRS report example
Multi-Column Stepped Format
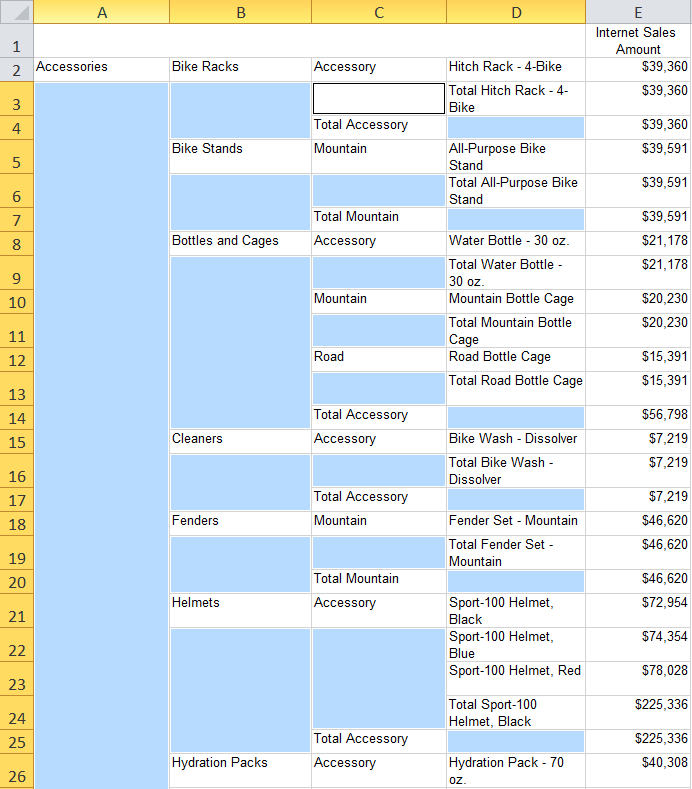
When this report is exported to Excel, it will look very similar to the report layout using merged cells to accomplish the formatting. To fill in the empty cells, follow the steps below:

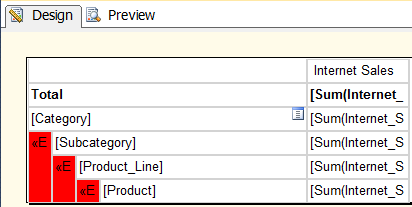
NOTE: In order for the selection of blank cells in the steps below to work, you may need to enter "=Nothing" as the expression in the row group text boxes highlighted in red below:


Highlighted text boxes in SSRS report indicating where to place "=Nothing" formula.
Stepped Format Report Design
  • Click the Enable Editing button (if necessary)
  • Select the cells for the entire worksheet
  • From the Home tab, click Merge & Center -> Unmerge Cells
  • You may want to widen the columns that contain the row groups (i.e., row labels), so that you can see the entire contents of the cells
NOTE: Here is where you may want to re-evaluate your report design. If Excel has had to create merged column cells in your table to accommodate lining up header images, report titles, etc., you may want to try to avoid that. By doing things like conditionally formatting header images to not export to Excel, stretching title text boxes to be the same width as the tablix, etc., the report will export in a more Excel friendly format.
  • Select just the range of cells that represent the row groups (i.e., the row labels) of the tablix
  • From the Home tab, click Find & Select -> Go to Special… -> Blanks
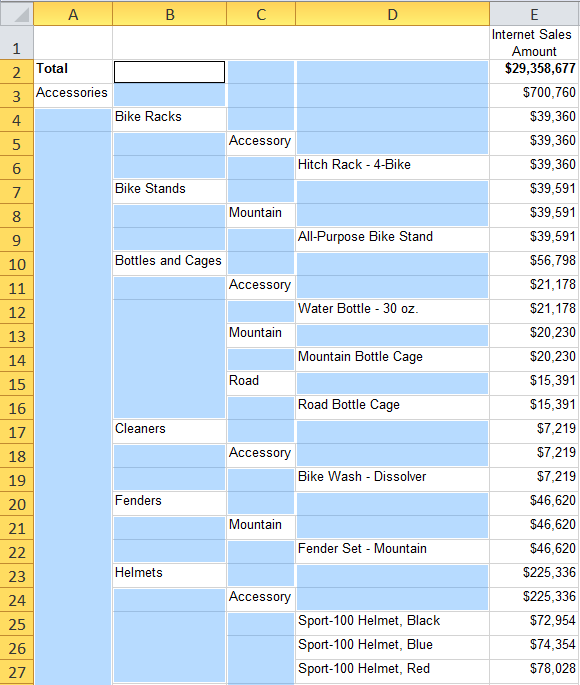
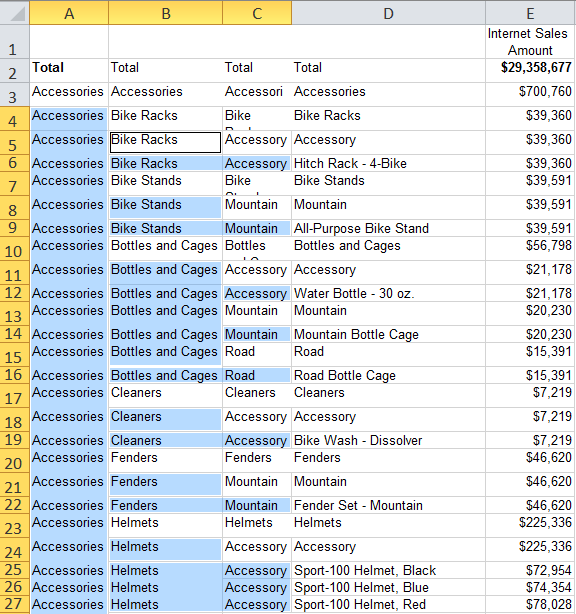
At this point just the blank cells that represent the row groups should be selected as in the image below:

Highlighting blank cells in SSRS report exported to Excel
With Blank Cells Selected
  • Holding down the Ctrl key, select a highlighted blank cell
  • Click in the formula box and type =IF(LEN(A2), A2, 1/0) where A2 is the cell to the left of your selected cell (in my case B2). This formula states that if the cell next to the selected cell is populated with text, use that, otherwise fill the cell with 1/0 which will cause an Invalid Cell Reference Error
  • Holding down the Ctrl key, hit the Enter key (this will copy the formula to all selected cells)
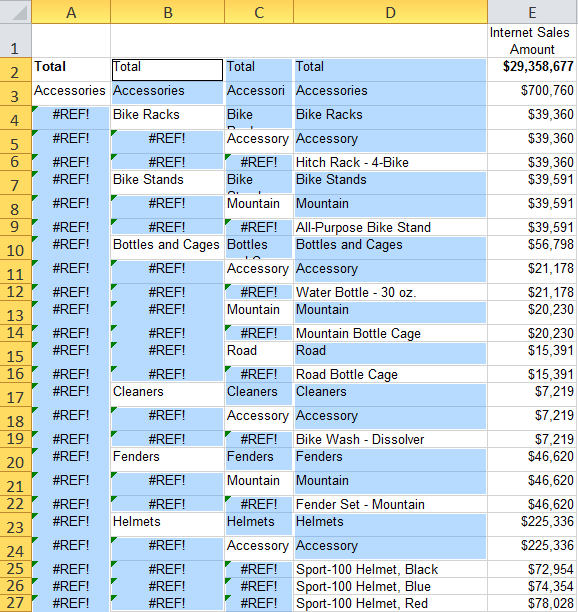
At this point you will have some cells that have been filled in with the correct information and others that show a #REF! error.

Populating blank cells with formula in SSRS report exported to Excel
With Cells Filled In
  • With the cells still selected, click Find & Select -> Go to Special… -> Formulas -> Errors (i.e., uncheck the Numbers, Text and Logicals checkboxes)
Now only the #REF! error cells should be selected, as in the image below:


Selecting error cells in SSRS report exported to Excel
With Error Cells Selected
  • Holding down the Ctrl key, select a highlighted blank cell
  • Click in the formula box and type the equals sign (i.e., =) over the existing formula 
  • Click on the cell above the selected cell (e.g., if your selected cell is B5, click on B4)
  • Holding down the Ctrl key, hit the Enter key (this will copy the formula to all selected cells)
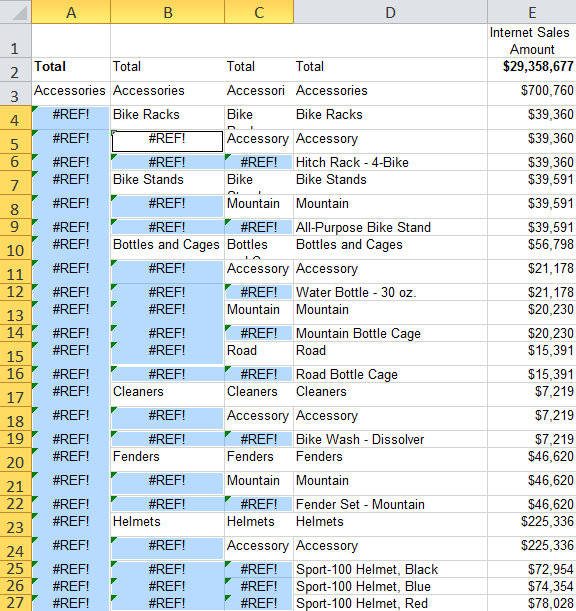
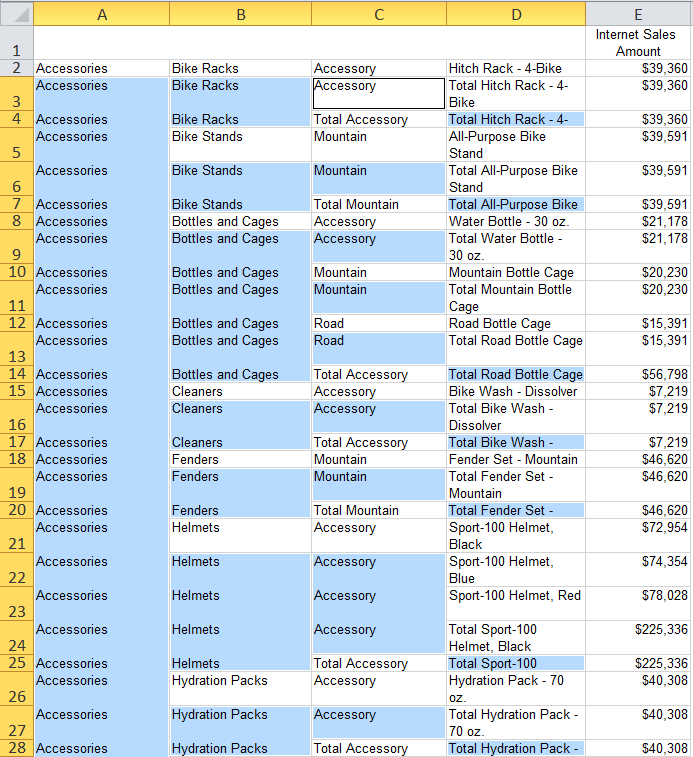
All of the cells should now be filled in with the appropriate data, as shown below:


Populating error cells with formula in SSRS report exported to Excel
With All Cells Filled In
  • Again, select just the range of cells that represent the row groups (i.e., the row labels)
  • From the Home tab, click Copy
  • Click Paste -> Values to replace the formulas with the actual values
You should now have a usable spreadsheet that you can sort, copy and paste rows into other worksheets, etc. Although it may have seemed like many steps to accomplish this task, once you've gone through it a couple of times, it will become a fairly simple Excel trick that you can add to your arsenal.

Sunday, November 9, 2014

SSRS: Filling in Cells of Reports Exported to Excel (Part 1)

Designing reports that have multiple row groups is a relatively common requirement in Reporting Services. This often means implementing either a block or multi-column stepped formatted report to display those groups (i.e., this post does not apply to a stepped format where all row groups appear in a single column using padding or spaces to offset the groups). The problem with these formats occurs once the report has been exported to Excel. To maintain the look of the report, Excel merges the cells of those row groups; however, to work with the data in Excel (e.g. sort, copy & paste selections into other worksheets, etc.) you’ll need to eventually unmerge those cells. Unfortunately, Excel doesn’t automatically fill in those unmerged cells with data where it exists. In part 1 of this 2-part post, I show how this can be accomplished for a block formatted report that has been exported to Excel.

A block format displays row groups in columns side by side as in the example below:


Block Format

When this report is exported to Excel, it will look very similar, using merged cells to accomplish the formatting. To fill in the cells, do the following after exporting the report to Excel:

  • Click the Enable Editing button (if necessary)
  • Select the cells for the entire worksheet
  • From the Home tab, click Merge & Center -> Unmerge

NOTE: Here is where you may want to re-evaluate your report design. If Excel has had to create merged column cells in your table to accommodate lining up header images, report titles, etc., you may want to try to prevent that. By doing things like conditionally formatting header images to not export to Excel, stretching title textboxes to be the same width as the tablix, etc., the report will export in a more Excel friendly format.
  • Select just the range of cells that represent the row groups (i.e., the row labels) of the tablix
  • From the Home tab, click Find & Select -> Go to Special… -> Blanks
At this point just the blank cells that represent the row groups should be selected as in the image below:

Blank Cells Selected
  • Holding down the Ctrl key, select a highlighted blank cell
  • Click in the formula box and type the equals sign (i.e., =)
  • Click on the cell above the selected cell (e.g., if your selected cell is C3, click on C2)
  • Holding down the Ctrl key, hit the Enter key (this will copy the formula to all selected cells)
With Cells Filled In
  • Again, select just the range of cells that represent the row groups (i.e., the row labels)
  • From the Home tab, click Copy
  • Click Paste -> Values to replace the formulas with the actual values
You should now have a usable spreadsheet that you can sort or copy and paste rows into other worksheets, etc.

In part 2 of this post, SSRS: Filling in Cells of Reports Exported to Excel (Part 2), I'll show how to do the same thing for a stepped formatted report, which is slightly more complicated.

Saturday, October 18, 2014

MDX: Top N by Group with All Others

When summarizing data using MDX, it’s a common requirement to find the top N by group (i.e., the top N tuples of one set for each member of another set). For example, you may need to find the top N brands by state or the top N products by calendar year based on sales count or amount. In MDX, this is accomplished using a combination of the Generate and TopCount functions. As an example, the following returns the top 5 products for each region based on sales amount:


WITH SET [Top N Products] AS
    Generate(
        [Sales Territory].[Sales Territory Region].Children
 , TopCount( 
            [Sales Territory].[Sales Territory Region].CurrentMember
  * [Product].[Product Categories].[Product].MEMBERS
            , 5
            , ( [Measures].[Internet Sales Amount] )
        ) 
    )
SELECT { [Measures].[Internet Sales Amount] } ON COLUMNS,
    NON EMPTY { [Top N Products] }  ON ROWS
FROM [Adventure Works]


This commonly available query uses the Generate function to evaluate the set produced by the TopCount of the cross product of regions and products, and applies it to each of the region member's children. This produces the following results:

Results of a Top N by Group MDX Query
Top N by Group Results

But this only provides part of the picture. Typically, I would want to include all other products within each region as well so that I could provide context to the top N items. For example, in a report (which could also be accomplished using MDX... but let's keep the MDX straightforward for this post) I could calculate each product's percent of sales within each region or each region's percent of sales versus all sales. In order to produce the all other products row for each region, we need to create a new calculated member (i.e., [All Other Products]) using the Aggregate and Except functions.

WITH SET [Top N Products] AS
    Generate(
        [Sales Territory].[Sales Territory Region].Children
 , TopCount( 
            [Sales Territory].[Sales Territory Region].CurrentMember
  * [Product].[Product Categories].[Product].MEMBERS
            , 5
            , ( [Measures].[Internet Sales Amount] )
        ) 
    )
    MEMBER [Product].[Product Categories].[All Other Products] AS 
 Aggregate( 
     Except( 
  NonEmpty( 
             { [Sales Territory].[Sales Territory Region].CurrentMember 
      * [Product].[Product Categories].[Product].MEMBERS } 
  )
  , [Top N Products] 
     )
 )
SELECT { [Measures].[Internet Sales Amount] } ON COLUMNS,
    NON EMPTY { 
 [Top N Products]
 , ( 
     [Sales Territory].[Sales Territory Region].[Sales Territory Region] 
     , [All Other Products] 
 ) 
    } ON ROWS
FROM [Adventure Works]

The Aggregate function takes a set (e.g., the cross product of region and product) and aggregates a measure (e.g., sales amount) within the current context. However, we additionally must use the Except function to exclude the top N products for each region from the aggregate. 

While the NonEmpty function within the Except doesn't make a difference in this example, it can provide a significant performance gain depending on the cross product that is being evaluated.

This query results in the following (as a note, I did use an Order function so that All Other Products would sort within each group, but I left it out of the MDX to keep the example clear):

Results of a Top N by Group with All Others MDX Query
Top N by Group with All Others Results

Although the MDX is a little more complicated, the results are much more useful, providing a basis for creating context for your top N values.

Tuesday, August 12, 2014

Downloading and Extracting US Census Bureau TIGER/Line Shapefiles

The United States Census Bureau (census.gov) site is a great resource for free spatial data such as state, county, census tract, etc. boundary files. These files can be used as is or used as a building block for creating custom sales territories. They can be loaded into SQL Server for use in spatial queries or for displaying boundaries on a map in an SSRS report. They can also be used to build map tiles for use with the Bing Maps API. This post, however, is focused on downloading and extracting these files.

These TIGER (Topologically Integrated Geographic Encoding and Referencing)/Line Shapefiles are available in many vintages, including definitions from the 1990, 2000 and 2010 censuses, with annual updates through 2013 (2014 should be available soon). The Census Bureau site provides several ways to access and download these files, but the easiest way is to use their FTP site (ftp://ftp2.census.gov/).

You can use an FTP client or, as shown here, you can simply use Windows Explorer.

Start by opening Windows Explorer and pasting ftp://ftp2.census.gov/ directly into the address bar. 

Navigate to the geo/tiger/. From this folder you will see the different vintages of TIGER files available. To illustrate the next step, lets say we're interested in the 2013 Census Tract boundaries.

Navigate to the TIGER2013/TRACT folder. In the right hand window (i.e. file list), you'll see a list of compressed (.zip) files with names based on the State FIPS Code, which is a two character numeric code assigned to each state, the District of Columbia and outlying areas of the U.S. (Puerto Rico, Guam, etc.).

Select the ZIP files you're interested in. I'm only interested in the U.S. states and DC, so I'm selecting files tl_2013_01.zip (AL) through tl_2013_56.zip (WY).

Right-click one of the selected files and select Copy from the popup menu.

Navigate to a folder on your local network, right-click the folder and select Paste. This may take a few minutes. I'll wait.

Now that you have the files on your local network, we need to extract (i.e. unzip) them. Unfortunately Windows Explorer falls short when needing to unzip multiple files. If you already have WinZIP or WINRAR installed, you could use either of those to unzip multiple files. I don't, so I'm going to use the following PowerShell script that I found on Steve Schofield's Blog: 

function UnZipMe($zipfilename,$destination) 
{ 
    $shellApplication = new-object -com shell.application 
    $zipPackage = $shellApplication.NameSpace($zipfilename) 
    $destinationFolder = $shellApplication.NameSpace($destination) 

    # CopyHere vOptions Flag # 4 - Do not display a progress dialog box. 
    # 16 - Respond with "Yes to All" for any dialog box that is displayed. 

    $destinationFolder.CopyHere($zipPackage.Items(),20) 
} 

# replace the following with the folder that contains your zipped files
$a = gci -Path C:\Data\USCBCensusTracts2013 -Filter *.zip 

foreach($file in $a) 
{ 
    Write-Host "Processing - $file" 
    UnZipMe –zipfilename $file.FullName -destination $file.DirectoryName 
}

Once this script finishes running, you will have all of your shapefiles ready to work with.

Wednesday, July 9, 2014

Getting the Last Run Report Parameter Value for an SSRS Report

I recently had a request by a report user to change the default for a couple of parameters in an SSRS report. Because default values were set on the report, it would automatically run when opened and the user would have to change the parameters to his preference and run the report again… every time. This seemed like a reasonable request except for the fact that the report was used by many people who did not necessarily want the default values changed. The alternative of not setting default values and forcing all report users to select them prior to running the report was an option, but would negatively impact those report users who were already satisfied with the existing defaults.

As the users of this report were rarely changing these particular parameters (other than to change the default value), I thought that if I could get the last value that they specified when running the report, it would generally be the value they’d prefer to use as the default.

Having created a few reports summarizing SSRS usage in the past, I knew that the parameters were logged, however rather than trying to write something from scratch, I turned to Google for an answer and came upon this blog post by Jegan, SSRS - Method to retrieve last run report parameters, which laid most of the groundwork for me.

In the post, he lays out a simple query to access all of the entries in the ExecutionLogStorage table for a single report. He then goes on to get a parameter value from the Parameters field for the most recent entry using knowledge of the existence of a second parameter to parse the string. I take a different tact below, using the parameter name/value pair delimiter (i.e. the ampersand) and the equals sign to isolate the parameter name (that's why I added the ampersand to the beginning of the parameter list) and value.

The result below handles parameter name/value pairs at the beginning or the end (why I add the ampersand to the end of the parameters list) of the string as well as anywhere in between. It also handles the case where the parameter name doesn't exist in the string (IIF) or if no records exist (UNION ALL) for the report name and user name combination. There are many ways to write the query below and get the correct results... I tried to write this for performance and the clarity of the SUBSTRING function.

SELECT TOP 1 ParValue
  FROM (
    SELECT els.TimeEnd 
      , IIF(CHARINDEX('&' + 'ParName' + '=', ParsString) = 0, 'DefaultParValue',
        SUBSTRING(ParsString 
          , StartIndex
          , CHARINDEX('&', ParsString, StartIndex) - StartIndex)) AS ParValue
      FROM (SELECT ReportID, TimeEnd 
            , '&' + CONVERT(VARCHAR(MAX), Parameters) + '&' AS ParsString 
            , CHARINDEX('&' + 'ParName' + '=', '&' + CONVERT(VARCHAR(MAX), Parameters) + '&') 
              + LEN('&' + 'ParName' + '=') AS StartIndex 
          FROM ExecutionLogStorage
          WHERE UserName='UserName' -- e.g. DOMAIN\Joe_Smith
          ) AS els 
        INNER JOIN [Catalog] AS c ON c.ItemID = els.ReportID
      WHERE c.Name = 'ReportName.rdl'
    UNION ALL
    SELECT CAST('2000-01-01' AS DateTime), 'DefaultParValue' 
  ) i
  ORDER BY TimeEnd DESC

The above could be re-written to get the values of several parameters at the same time to be used within a single SSRS dataset, however not much is gained as Reporting Services executes the dataset query for each parameter that it is attached to. Therefore, it may make sense to parameterize the arguments (i.e. the user name, report name, parameter name, and default parameter value) and turn it into a stored procedure. This may also prevent you from having to add a data source pointing to your Reporting Services database.

A few things to note when using this code to access parameter values for use within an SSRS report...

First, if you have Boolean parameters that you wish to use this with, you’ll have to convert them to Text. Also, it should be clear that this does not work with multi-value parameters (I'll save that for a future post).

Second, as Jegan notes in his blog post, "the parameter value passed to the report when previewing in visual studio won't be logged in ReportServer database as the report execution is not from ReportServer". This means you will need to deploy the report to see that the default changes on subsequent report launches.

Finally, in my environment, passing Globals!ReportName as a parameter value in Visual Studio 2010 returns “ReportName” (i.e. the report name without the extension), whereas 2012 SQL Server Reporting Services (Sharepoint integrated mode) returns “ReportName.rdl”. Just something to be aware of as you need to use the report name with the extension.

Oh, just one more thing. Many would advise against this as its hitting the Reporting Services database which could affect performance, or Microsoft could change the database structure, breaking your query, etc. Use at your own risk.

Tuesday, September 10, 2013

SSRS Beginner Tip: Generating PNGs from an SSRS Report (and PowerShell)

I recently had to generate a couple of dozen map images to be used by a client in their company website. The required map basically needed to be centered and zoomed on a sales territory boundary, highlighting it, displaying the trade areas within it and showing a Bing Maps background. SSRS wouldn't have necessarily been my first choice to create maps (MapInfo would have been), however I already had an SSRS report that contained this exact map. All I had to do was copy it and remove a couple of tables.

So setting up the SSRS report was pretty straight forward. In order to generate an image for each of the sales territories, I had to additionally create a Data-Driven Subscription, passing in the sales territory code into a report parameter. Again, pretty straight forward, until I realized that the only image export format available was a TIFF image file, which wouldn't work for the clients web page. They required a JPG or PNG.

The answer was to go ahead and generate the TIFFs using the subscription and then run this handy PowerShell script which would convert each image to a PNG:

#Load required assemblies and get object reference 
[Reflection.Assembly]::LoadWithPartialName("System.Windows.Forms");

$path = "C:\MapImages"

Get-ChildItem $path *.tif |
    ForEach-Object { 
        $i = new-object System.Drawing.Bitmap($_.FullName);
        # Save with the image in the desired format
        $i.Save($("$($path)\$($_.BaseName).png"),"PNG"); 
    }

This script loops through each of the TIFFs located in the specified path, opening them and then saving them with the specified PNG format with the same base name as the TIFF. Most of this tiny script can be credited to the Hey, Scripting Guy! Blog post Hey, Scripting Guy! How Can I Use Windows PowerShell to Convert Graphics Files to Different File Formats?

Saturday, April 20, 2013

SSRS Beginner Tip: How to Determine if All Values are Selected in a Multi-Value Parameter

In Reporting Services, there are generally two different methods to determine when a user has selected all of the values in a multi-value parameter (i.e. a parameter where the “allow multiple values” checkbox has been checked). The method to choose is dependent upon whether you are trying to determine this during report rendering or as part of the data retrieval for the report. Usually this will become a requirement when the multi-value parameter is populated from a dataset (i.e. “Get values from a query” has been selected from the Available Values tab) as opposed to being hard-coded (i.e. “Specify values” has been chosen from the Available Values tab) where the number of available values is static and known.

An example of needing to determine if all parameter items are selected during report rendering, is when you need to display the selected values from a multi-value parameter on your report. Rather than display a list of all items in the case that all are selected (or none were de-selected), you could show something like: “Selected Brands: All”. This would be particularly nice is the parameter list is long.

This can be accomplished by comparing the count of items from the dataset that populates the available values of the parameter using the CountRows aggregate function, to the count of selected parameter items using the parameter object’s Count function. In the example below, the dataset is named dsBrands and the parameter is named Brands:

="Selected Brands: " & IIf(CountRows("dsBrands").Equals(Parameters!Brands.Count),
"All", Join(Parameters!Brands.Label, ", ")

You cannot, however, use this method if you are trying to determine if the user has selected all values as part of the data retrieval process for the report. An example of this would be when you are constructing your dataset query as part of a function based on the selected items from a multi-value parameter (this will become clearer in the example below). If you try to use the CountRows function at this point, you’ll receive an error similar to the following:

“Aggregate and lookup functions cannot be used in query parameter expressions”

The Parameter object does not provide a function to get the total item count, but as mentioned above, it does provide the selected item count. Therefore you can set up a second Internal or Hidden parameter and set the default values to the same dataset, thereby allowing you to retrieve the total item count from the hidden parameter and the selected item count from the visible parameter. In the following simple MDX query, I am adding the Brand constraint only if the user has not requested all brands:

="SELECT NON EMPTY { [Units] } ON COLUMNS, " &
    "NON EMPTY { [Geography].[State].[State] } ON ROWS " &
IIf(Parameters!Brands.Count=Parameters!HiddenBrands.Count, Nothing, 
    "FROM ( SELECT ( STRTOSET(@Brands, CONSTRAINED) ) ON COLUMNS ") &
    "FROM [Motorsports]" & 
IIf(Parameters!Brands.Count=Parameters!HiddenBrands.Count, Nothing, ")")

As a note, you can use this method (i.e. creating a hidden parameter) to perform the first task of determining if all parameter items are selected during report rendering, however it is not as efficient, as it results in the dataset query being performed twice, once for each of the parameters (visible and hidden).

Friday, February 22, 2013

The Broken “Export to Excel” Web Part Menu Item for PPS SSRS Web Parts and a Workaround

One of the side effects of using cumulative updates (CUs) is that functionality can break. I experienced this when applying the February 2012 CU to SharePoint 2010 SP1, which was required to fix some crucial functionality that was broken in SP1. The result, however, was that the "Export to Excel" web part menu item no longer worked for PerformancePoint Reporting Services web parts. The menu item is available, but instead of exporting, it opens the web part in the RSViewerPage.aspx page. Not real useful.

Upon some Googling, I found this forum entry indicating that the problem existed in the December 2011 CU and that it still exists with the December 2012 CU: http://social.technet.microsoft.com/Forums/en-US/ppsmonitoringandanalytics/thread/1d39d413-2756-450c-a40c-60c4dfe76fa1

As an additional note, this may be limited to an environment using SharePoint 2010 with SQL Server 2012 (this does work correctly with SharePoint 2010 SP1 with no CUs applied and SQL Server 2008 R2 SP1).

As the "Export to Excel" web part menu item was now rendered useless, I used PowerShell to loop through all of my dashboard pages, identifying the web parts that display PPS SSRS reports, and then hiding the "Export to Excel" menu item for those web parts so as not to confuse my dashboard users.

$webPart.IsAllowExportToExcel = "Hide" # Enabled, Disabled or Hide
$webPartManager.SaveChanges($webPart)

I left it at that for quite awhile, until in January I found time to revisit this problem and explore a workaround to allow the PPS SSRS web parts to be exported.

Something that I already knew worked correctly was the PPS SSRS web part’s toolbar’s exporting capability. So I could have just checked the "Show toolbar" checkbox in Dashboard Designer’s Report Settings for each of my SSRS web parts, but then the entire toolbar would display, taking up valuable real estate and providing unnecessary functionality for my dashboard web parts (e.g. page navigation, search, zooming, etc.), when I really only needed the exporting capability.

So instead I thought if I could dynamically show the toolbar, that would be an improvement over having it always being displayed. So again, with a little Googling, I found inspiration in the MSDN Library under an entry within the SQL Server 2012 Reporting Services Features and Tasks section called URL AccessParameter Reference. I could use query string arguments in the iframe element that displays the report to not only show the toolbar, but limit the toolbar functionality to just the exporting capability.

The next decision was how to incorporate this knowledge into my dashboard web parts. My first idea was to use jQuery to add a menu item, such as "Show Toolbar", to the web part’s menu, but I didn’t like how it would then take up real estate and cause my report to be partially obscured since I was setting the web part’s height. So instead I thought what if the toolbar only displayed when I opened the PPS SSRS web part in a new window using the web part’s "Open in New Window" menu item. Not perfect, but acceptable and relatively easy to accomplish. This would require editing the DynamicView.master and DynamicReportView.aspx files located in C:\Program Files\Common Files\Microsoft Shared\Web Server Extensions\14\TEMPLATE\LAYOUTS\PPSWebParts\ (I’ll leave it to you to determine how you would manage these two files and their deployment).
 
In the DynamicView.master file, I just had to add the PlaceHolderAdditionalPageHead server tag right before the closing HEAD tag (i.e. </head>):

<asp:ContentPlaceHolder id="PlaceHolderAdditionalPageHead" runat="server"/>

In the DynamicReportView.aspx file, I just had to add the following right before the "PlaceHolderMain" server tag:

<asp:Content ContentPlaceHolderId="PlaceHolderAdditionalPageHead" runat="server">
    <script src="../myScripts/jquery-1.7.1.min.js" type="text/javascript"></script>
    <!-- Shows Actions menu on toolbar (kb130521) -->
    <script type="text/javascript" language="javascript">
        function NotifyBrowserOfAsyncUpdate(elem) {
            $(elem).find('iframe[src*="%2Erdl"]').attr('src', function (i, val) {
                return val.replace('&rv:Toolbar=None&', '&rv:Toolbar=Full&rv:ToolBarItemsDisplayMode=128&')
            });
        }
        $(document).ready(function () {
            $('body').find('[text="Export to Excel"]').hide();
        });
    </script>
</asp:Content>

Like a couple of other blog posts that I have written, I’m using the NotifyBrowserOfAsyncUpdate function to notify the page when the asynchronous retrieval of the web part is complete. Then I use jQuery to find the iframe hosting the PPS SSRS web part and modify the "src" attribute to display the toolbar, but limit the menu items to just the export functionality. I additionally add a document ready function to hide the "Export to Excel" menu item that will appear in the web part's menu.

Now upon clicking a PPS SSRS web part menu's "Open in New Window" menu item, I get the following in a new window, showing the toolbar with just the Export menu option.


Thursday, August 23, 2012

Default SSRS 2012 Parameters Pane to Collapsed in a PerformancePoint Reporting Services Web Part


Using PerformancePoint Reporting Services web parts on a dashboard is a great way to display information alongside Analytic Reports, in ways that aren’t supported by Analytic Reports (e.g. maps or scatter charts) or for data that doesn’t exist in your Analysis Services cubes. Offering visible parameters for your users to manipulate can additionally increase the value and interactivity of a report. However, when displaying a PerformancePoint Reporting Services web part with parameters, the parameters pane defaults to being expanded. Below is an example of a line chart that wouldn’t be easily possible using an Analytic Chart, with the parameters pane obscuring half of it.

Generally this is good (i.e. having the parameters pane defaulting to expanded), but if real estate is an issue (like in the image above), you may want that pane collapsed in its initial state. To work around this issue, we can use the NotifyBrowserOfAsyncUpdate event and some jQuery to locate a PerformancePoint Reporting Services web part and collapse the parameters pane, if it exists. Note, that this event is triggered for every PerformancePoint web part that is updated on a page.

function NotifyBrowserOfAsyncUpdate(elem) {
    // id of web part being updated
    var elemId = $(elem).prop('id');
    // find iframe sources that contain .rdl
    $('#' + elemId).find('iframe[src*="%2Erdl"]').attr('src', function(i, val) {
        return val.replace('&rv:ParamMode=Displayed&','&rv:ParamMode=Collapsed&')
    });
}

Now when your dashboard is displayed, the parameters pane will default to being collapsed, showing your chart, map or tablix in all of its glory.

Sunday, May 20, 2012

SharePoint 2010, SSRS 2012 and Internet Explorer 9 Issues

In SharePoint 2010, when using the RSViewerPage.aspx to view SSRS reports in Internet Explorer 9, you may experience the following problems:
  • Increasing the Zoom percentage to more than 100% on the page’s toolbar results in the top of the report not being visible. Decreasing the Zoom percentage below 100% results in extra whitespace at the top of the report.
  • The Actions->Export flyout menu does not appear.
I have additionally experienced a problem with a PerformancePoint Reporting Services web part that is displayed in a modal dialog called using SharePoint’s SP.UI.ModalDialog.showModalDialog method. When I click a button on the page that calls the method and displays the dialog, the report will update itself based on connections to filters on the page. Works great in IE7, IE8, Chrome and FireFox, however in IE9, the update to the report is only triggered in compatibility mode.

Adding your site to IE9’s Compatibility View settings list (Tools->Compatibility View settings) should fix the functionality. After discovering this workaround on my own, I stumbled across the following Microsoft Knowledge Base article which addresses the Export menu issue:
FIX: SSRS 2008 R2 report or SSRS 2012 report has no Export menu in Internet Explorer 9.0 if you use the out-of-box viewer page in the SharePoint Report Viewer Web Part (http://support.microsoft.com/kb/2616481).
I’m hoping the Zoom problem and my modal dialog report update problem would be addressed by the fix mentioned in the KB article as well. I’ll update this post eventually when we apply the CU.

UPDATE 7/16/12: I installed SQL Server 2012 CU2 (11.0.2325), which is supposed to include the fixes from CU1 (mentioned in the kb article above), and it has not, unfortunately, fixed any of the issues mentioned in this post.

UPDATE 11/14/12: I installed SQL Server 2012 SP1 (11.0.3000) with the same results: none of the issues mentioned in this post have been addressed.