Wednesday, April 30, 2014

Creating Map Tiles (Part 1) - Exporting MapInfo TAB Files to ESRI SHP Files Using PowerShell and MapInfo

I recently had the requirement to display sales territory boundaries within a Bing Maps web application that I had written. The boundaries were actually a set of custom sales territories (e.g. region, district, markets) using counties as a building block. After some research, I determined the best way to incorporate these boundaries into my Bing Maps application was to generate a set of map tiles which would progressively show the boundaries (e.g. regions then districts then markets and finally counties) as you zoomed in.

For much of the process of creating map tiles, I relied on an excellent series of posts by Pedro Sousa on his blog, Pedro's Tech Mumblings. Starting with Part 2 of his series, he introduces you to TileMill and shows how it can be used to design a map.

One of the first steps after installing TileMill is to create a new project and add map layers to it, and one of the options for the map layers is to use ESRI Shape (.shp) files. I had a bit of a head start in the process as I had been using MapInfo and MapBasic to create MapInfo TAB files for many years for use in a desktop application that I had written back in the late 1990's. Because of my familiarity with MapInfo, I knew that it included a MapBasic tool called the Universal Translator which is a data conversion tool built on Safe Software's FME (Feature Manipulation Engine) technology. This could be used to translate my MapInfo TAB files into ESRI Shape files. However, I had several different boundary sets, consisting of several different boundaries (a dozen total), that I needed to create, and using an interactive tool would be tedious. I also had two boundaries that needed to be generated monthly, so automating the process was a must.


Because I could use MapBasic to write something to call the Universal Translator within MapInfo I knew I could automate the process. However, I got lucky when I unexpectedly stumbled upon the Universal Translator User Guide, which included information on how the MapInfo Universal Translator could be called from the command line. Armed with this information, I was able to quickly put together the following PowerShell script to convert all of my files.


function ExportTabToShp() {
    param(
        [Parameter(mandatory=$true)] [string]$TAB_PATH,
        [Parameter(mandatory=$true)] [string]$outputPath
    )

    $baseName = [System.IO.Path]::GetFileNameWithoutExtension($TAB_PATH)
    
    # Application name of the MapInfo Universal Translator
    $CMD = "C:\Program Files (x86)\MapInfo\Professional\UT\Imut.exe"
    
    # Command that generates a semantic control file
    $IMUT_COMMAND = "CFGenerate"
    
    # Input format is MapInfo .TAB
    $INPUT_FORMAT = "MAPINFO"
    
    # Output format is the ESRI Shapefile format
    $OUTPUT_FORMAT = "SHAPE"
    
    # Path and filename of the semantic control file
    $FME_PATH = $outputPath + $baseName + ".fme"
    
    #Path and filename of the logfile to be generated
    $LOG_FILENAME = $outputPath + "mut.log"

    # Generate a mapping file:
    write-host "Note the RemoteException that is thrown is simply a message stating that the 'Mapping File Generation' was successful:" -ForegroundColor Green
    & $CMD $IMUT_COMMAND $INPUT_FORMAT $OUTPUT_FORMAT $TAB_PATH $FME_PATH LOG_STANDARDOUT "YES" LOG_FILENAME $LOG_FILENAME LOG_APPEND "YES"

    # Run the mapping file:
    write-host "Note the RemoteException that is thrown is simply a message stating that the 'Translation' was successful:" -ForegroundColor Green
    & $CMD $FME_PATH --HOMOGENOUS_GEOMETRY "YES" --_SHAPE_FILE_TYPE "2d" --SourceDataset $TAB_PATH --DestDataset $outputPath --_EXTENSION "TAB" --_BASENAME $baseName --_FULLBASENAME $baseName
}

ExportTabToShp "C:\TABs\county.tab" "C:\SHPs\"

The first call in the ExportTabToShp function generates an FME file, which is a "mapping file" that controls the translation. The second call runs the translation using the generated FME file. Refer to the User Guide link above for more information required to expand this function to support other translations.

Note the use of the Call operator (i.e. &) in the above PowerShell script. This allows one to call an executable formatted as a string and is useful when there is a space in the path to the executable.

In the next part of this series, Creating Map Tiles (Part 2) - Creating a Sales Territory Boundary Set Using TileMill,I'll walk through a couple of the steps that I used in TileMill to create the sales territory boundary sets.

Monday, September 30, 2013

PerformancePoint Multi-Select Tree Filter Zoom Issue in Internet Explorer

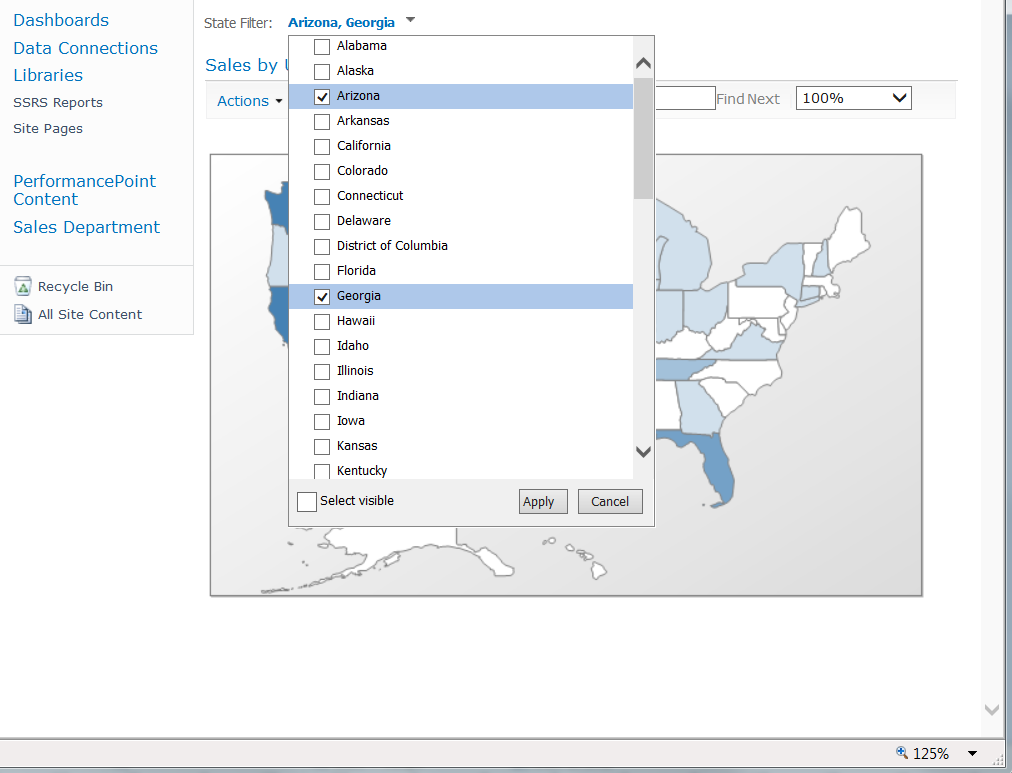
Recently I needed to create a Multi-Select Tree Filter for one of my PerformancePoint dashboards. I’ve created plenty of List Filters against Named Sets, Member Selections and MDX Queries in the past, and I’ve even created my own custom textbox PerformancePoint filters, but until recently, I hadn’t had the need for a Multi-Select Tree Filter. For a new dashboard that I was creating, I basically needed a simple checkbox list to use as a PerformancePoint dashboard filter and the Multi-Select Tree Filter fit the bill perfectly. It was easy to create and it seemed to work well too, until I attempted a live demo of the dashboard to an internal group.

With the dashboard projected onto a wall and zoomed in using Internet Explorer’s zoom so that everyone could clearly view the dashboard, I expanded the filter, only to get something similar to the following:
 
 
A complete fail.

In the moment, I neglected to realize that it was IE's zoom causing the problem, although I quickly discovered that back at my desk. At 100% it displayed perfectly. As IE's zoom increased or decreased away from 100%, the list moved out of view either to the upper left or to the lower right, eventually, just showing the word "false". Setting a zoom level in Chrome worked fine (of course), which did help me in finding a solution rather quickly.
 
Using Chrome's Developer tools I found that one of the enclosing DIV elements that displays the dropdown was using the following filter:
 
.pps-tree-layer1 {
    filter: progid:DXImageTransform.Microsoft.Shadow(color=#333333,direction=130,strength=3)
}
 
Switching over to IE's Developer tools and disabling that filter, enabled the Multi-Select Tree Filter to display properly when zooming. A quick Google search for how to remove the filter via CSS yielded a blog post by Brian Johnson on How to Disable a CSS Filter in Internet Explorer. I applied that to the correct element as follows:
 
.pps-tree-layer1 {
    /* For IE 8+ */
    -ms-filter: "progid:DXImageTransform.Microsoft.Shadow(enabled = false)"!important;
    /* For IE 5.5 - 7 */
    filter: progid:DXImageTransform.Microsoft.Shadow(enabled = false)!important;
}

and viola...


Zoomed and displaying correctly!

Tuesday, September 10, 2013

SSRS Beginner Tip: Generating PNGs from an SSRS Report (and PowerShell)

I recently had to generate a couple of dozen map images to be used by a client in their company website. The required map basically needed to be centered and zoomed on a sales territory boundary, highlighting it, displaying the trade areas within it and showing a Bing Maps background. SSRS wouldn't have necessarily been my first choice to create maps (MapInfo would have been), however I already had an SSRS report that contained this exact map. All I had to do was copy it and remove a couple of tables.

So setting up the SSRS report was pretty straight forward. In order to generate an image for each of the sales territories, I had to additionally create a Data-Driven Subscription, passing in the sales territory code into a report parameter. Again, pretty straight forward, until I realized that the only image export format available was a TIFF image file, which wouldn't work for the clients web page. They required a JPG or PNG.

The answer was to go ahead and generate the TIFFs using the subscription and then run this handy PowerShell script which would convert each image to a PNG:

#Load required assemblies and get object reference 
[Reflection.Assembly]::LoadWithPartialName("System.Windows.Forms");

$path = "C:\MapImages"

Get-ChildItem $path *.tif |
    ForEach-Object { 
        $i = new-object System.Drawing.Bitmap($_.FullName);
        # Save with the image in the desired format
        $i.Save($("$($path)\$($_.BaseName).png"),"PNG"); 
    }

This script loops through each of the TIFFs located in the specified path, opening them and then saving them with the specified PNG format with the same base name as the TIFF. Most of this tiny script can be credited to the Hey, Scripting Guy! Blog post Hey, Scripting Guy! How Can I Use Windows PowerShell to Convert Graphics Files to Different File Formats?

Saturday, April 20, 2013

SSRS Beginner Tip: How to Determine if All Values are Selected in a Multi-Value Parameter

In Reporting Services, there are generally two different methods to determine when a user has selected all of the values in a multi-value parameter (i.e. a parameter where the “allow multiple values” checkbox has been checked). The method to choose is dependent upon whether you are trying to determine this during report rendering or as part of the data retrieval for the report. Usually this will become a requirement when the multi-value parameter is populated from a dataset (i.e. “Get values from a query” has been selected from the Available Values tab) as opposed to being hard-coded (i.e. “Specify values” has been chosen from the Available Values tab) where the number of available values is static and known.

An example of needing to determine if all parameter items are selected during report rendering, is when you need to display the selected values from a multi-value parameter on your report. Rather than display a list of all items in the case that all are selected (or none were de-selected), you could show something like: “Selected Brands: All”. This would be particularly nice is the parameter list is long.

This can be accomplished by comparing the count of items from the dataset that populates the available values of the parameter using the CountRows aggregate function, to the count of selected parameter items using the parameter object’s Count function. In the example below, the dataset is named dsBrands and the parameter is named Brands:

="Selected Brands: " & IIf(CountRows("dsBrands").Equals(Parameters!Brands.Count),
"All", Join(Parameters!Brands.Label, ", ")

You cannot, however, use this method if you are trying to determine if the user has selected all values as part of the data retrieval process for the report. An example of this would be when you are constructing your dataset query as part of a function based on the selected items from a multi-value parameter (this will become clearer in the example below). If you try to use the CountRows function at this point, you’ll receive an error similar to the following:

“Aggregate and lookup functions cannot be used in query parameter expressions”

The Parameter object does not provide a function to get the total item count, but as mentioned above, it does provide the selected item count. Therefore you can set up a second Internal or Hidden parameter and set the default values to the same dataset, thereby allowing you to retrieve the total item count from the hidden parameter and the selected item count from the visible parameter. In the following simple MDX query, I am adding the Brand constraint only if the user has not requested all brands:

="SELECT NON EMPTY { [Units] } ON COLUMNS, " &
    "NON EMPTY { [Geography].[State].[State] } ON ROWS " &
IIf(Parameters!Brands.Count=Parameters!HiddenBrands.Count, Nothing, 
    "FROM ( SELECT ( STRTOSET(@Brands, CONSTRAINED) ) ON COLUMNS ") &
    "FROM [Motorsports]" & 
IIf(Parameters!Brands.Count=Parameters!HiddenBrands.Count, Nothing, ")")

As a note, you can use this method (i.e. creating a hidden parameter) to perform the first task of determining if all parameter items are selected during report rendering, however it is not as efficient, as it results in the dataset query being performed twice, once for each of the parameters (visible and hidden).

Friday, February 22, 2013

The Broken “Export to Excel” Web Part Menu Item for PPS SSRS Web Parts and a Workaround

One of the side effects of using cumulative updates (CUs) is that functionality can break. I experienced this when applying the February 2012 CU to SharePoint 2010 SP1, which was required to fix some crucial functionality that was broken in SP1. The result, however, was that the "Export to Excel" web part menu item no longer worked for PerformancePoint Reporting Services web parts. The menu item is available, but instead of exporting, it opens the web part in the RSViewerPage.aspx page. Not real useful.

Upon some Googling, I found this forum entry indicating that the problem existed in the December 2011 CU and that it still exists with the December 2012 CU: http://social.technet.microsoft.com/Forums/en-US/ppsmonitoringandanalytics/thread/1d39d413-2756-450c-a40c-60c4dfe76fa1

As an additional note, this may be limited to an environment using SharePoint 2010 with SQL Server 2012 (this does work correctly with SharePoint 2010 SP1 with no CUs applied and SQL Server 2008 R2 SP1).

As the "Export to Excel" web part menu item was now rendered useless, I used PowerShell to loop through all of my dashboard pages, identifying the web parts that display PPS SSRS reports, and then hiding the "Export to Excel" menu item for those web parts so as not to confuse my dashboard users.

$webPart.IsAllowExportToExcel = "Hide" # Enabled, Disabled or Hide
$webPartManager.SaveChanges($webPart)

I left it at that for quite awhile, until in January I found time to revisit this problem and explore a workaround to allow the PPS SSRS web parts to be exported.

Something that I already knew worked correctly was the PPS SSRS web part’s toolbar’s exporting capability. So I could have just checked the "Show toolbar" checkbox in Dashboard Designer’s Report Settings for each of my SSRS web parts, but then the entire toolbar would display, taking up valuable real estate and providing unnecessary functionality for my dashboard web parts (e.g. page navigation, search, zooming, etc.), when I really only needed the exporting capability.

So instead I thought if I could dynamically show the toolbar, that would be an improvement over having it always being displayed. So again, with a little Googling, I found inspiration in the MSDN Library under an entry within the SQL Server 2012 Reporting Services Features and Tasks section called URL AccessParameter Reference. I could use query string arguments in the iframe element that displays the report to not only show the toolbar, but limit the toolbar functionality to just the exporting capability.

The next decision was how to incorporate this knowledge into my dashboard web parts. My first idea was to use jQuery to add a menu item, such as "Show Toolbar", to the web part’s menu, but I didn’t like how it would then take up real estate and cause my report to be partially obscured since I was setting the web part’s height. So instead I thought what if the toolbar only displayed when I opened the PPS SSRS web part in a new window using the web part’s "Open in New Window" menu item. Not perfect, but acceptable and relatively easy to accomplish. This would require editing the DynamicView.master and DynamicReportView.aspx files located in C:\Program Files\Common Files\Microsoft Shared\Web Server Extensions\14\TEMPLATE\LAYOUTS\PPSWebParts\ (I’ll leave it to you to determine how you would manage these two files and their deployment).
 
In the DynamicView.master file, I just had to add the PlaceHolderAdditionalPageHead server tag right before the closing HEAD tag (i.e. </head>):

<asp:ContentPlaceHolder id="PlaceHolderAdditionalPageHead" runat="server"/>

In the DynamicReportView.aspx file, I just had to add the following right before the "PlaceHolderMain" server tag:

<asp:Content ContentPlaceHolderId="PlaceHolderAdditionalPageHead" runat="server">
    <script src="../myScripts/jquery-1.7.1.min.js" type="text/javascript"></script>
    <!-- Shows Actions menu on toolbar (kb130521) -->
    <script type="text/javascript" language="javascript">
        function NotifyBrowserOfAsyncUpdate(elem) {
            $(elem).find('iframe[src*="%2Erdl"]').attr('src', function (i, val) {
                return val.replace('&rv:Toolbar=None&', '&rv:Toolbar=Full&rv:ToolBarItemsDisplayMode=128&')
            });
        }
        $(document).ready(function () {
            $('body').find('[text="Export to Excel"]').hide();
        });
    </script>
</asp:Content>

Like a couple of other blog posts that I have written, I’m using the NotifyBrowserOfAsyncUpdate function to notify the page when the asynchronous retrieval of the web part is complete. Then I use jQuery to find the iframe hosting the PPS SSRS web part and modify the "src" attribute to display the toolbar, but limit the menu items to just the export functionality. I additionally add a document ready function to hide the "Export to Excel" menu item that will appear in the web part's menu.

Now upon clicking a PPS SSRS web part menu's "Open in New Window" menu item, I get the following in a new window, showing the toolbar with just the Export menu option.


Thursday, January 31, 2013

Removing the Word "(Hidden) " from SharePoint Web Part Tooltips

When developing a dashboard in PerformancePoint 2010, one approach to managing the web parts that are displayed on the page is to use a PerformancePoint Filter to conditionally display web parts as a group. For example, I could have a filter that consists of the values "Market Share", "Dealers" and "Trend". By connecting this filter to web parts on the dashboard using the Display Conditions tab on the Configure Connection dialog, I can display certain web parts when "Market Share" is selected, others when "Dealers" is selected, etc.

The problem arises when, after a page refresh, you click on your filter to display a different group of web parts. The tooltip will now have the word "(Hidden) " prefacing the name of the web part in the tooltip for the web part menu, the web part icon and the web part description (see below).


Clearly the web part is not hidden. For whatever reason, this is indicating the initial state of the web part after a full page postback. Helpful? Not Really. Annoying? Definitely.

With a little jQuery, we can easily remove that word from all web parts in the document ready function.


$(document).ready(function () {
    // Remove "(Hidden) " from a title, img alt and td title tags
    $('td[title^="(Hidden) "]').each(function (index) {
        $(this).attr('title', $(this).attr('title').replace('(Hidden) ', ''));
    });
    $('img[alt^="(Hidden) "]').each(function (index) {
        $(this).attr('alt', $(this).attr('alt').replace('(Hidden) ', ''));
    });
    $('a[title^="(Hidden) "]').each(function (index) {
        $(this).attr('title', $(this).attr('title').replace('(Hidden) ', ''));
    });
});

There is certainly room for targeting the selector better here, but I did want to show that there are several tags that need to be addressed. Either way  the result is the same: a less confusing dashboard for your users.

Monday, December 17, 2012

Third Party Active Directory Password Management Web Parts for SharePoint 2010


As part of a project that I am currently working on, we need to allow users to manage their own Active Directory passwords on a SharePoint 2010 extranet. Ideally, the users will be able to change their password, reset their password (e.g. in case it is forgotten or expires), and be alerted as to when their password will expire.

After much Googling, I limited the options of possible Active Directory password management web parts for use with SharePoint 2010 to six. They all require licensing and generally break out the functionality into separate web parts. Below are my notes with little editorial. I'll eventually update this post with what I chose and why.

1.     Bamboo Solutions
i.            Password Change
a.   "Give your internal and external SharePoint users the power to change their SharePoint account passwords through SharePoint. No need to build a separate Web application to complete a simple, but essential security task. With the Bamboo Password Change Web Part, users can change their password on-demand and still comply with the defined password policy."
b.   Cost: $795 per server license; 30-Day Trial
c.    Comments: Probably the nicest looking of the bunch with a password strength indicator.

ii.           Password Reset
a.   "With the importance of login security growing and password requirements increasing, it is becoming easier for users to forget their passwords. With the Password Reset Web Part, users now have the ability to submit their own password reset requests through SharePoint, no longer requiring IT administration assistance. With two types of ID verification available, users can reset their password by email confirmation or by answering predefined security questions (Active Directory accounts only)."
b.   Cost: $795 per server license; 30-Day Trial

iii.          Password Expiration
a.   "Are you enforcing expiration of Active Directory Service account passwords, and as a result, your external users are having difficulty logging in to SharePoint due to expired passwords? Dramatically cut down on the overhead costs of troubleshooting login issues with the Password Expiration Web Part. The Password Expiration Web Part provides an early warning system for SharePoint users when their password is about to expire."
b.   Cost: $795 per server license; 30-Day Trial

2.     SharePointBoost
i.            Password Change and Expiration
a.   "Passwords management can represent a big deal of time and energy for Administrators. This password changing web part delegates most of the work to Users and takes in charge all notifications and confirmations. In this way Administrators can organize their work well in advance and simply monitor the process, thus being available for more rewarding tasks without compromising security."
b.   Cost: $599 per server (Farm and Site Collection licenses also available); 30-Day Trial

ii.           SharePoint Password Reset
a.   "A simple web part that lets users reset their password right on their SharePoint page without having to ask the administrator or IT for assistance. New password will be sent online or through email delivery."
b.   Cost: $599 per server (Farm and Site Collection licenses also available) ; 30-Day Trial
c.    Comments: Purchase together for $899.

3.     Virto Software
i.            Virto Password Change Web Part for Microsoft®SharePoint 2007 and 2010 
a.   "Virto Password Changer Web Part for SharePoint 2007 & 2010 enables Active Directory (AD) users and users with general accounts (FBAP) to change themselves their passwords when they are logged onto SharePoint Site."
b.   Cost: $295 commercial license per WFE server; development license $149; 30-Day Trial

ii.           Virto AD Password Reset and Recovery Web Part for Microsoft® SharePoint 2007 and 2010
a.   "Virto Password Reset & Recovery Web Part for Microsoft SharePoint 2007 and 2010 allows any user logged in to the SharePoint portal using Active Directory authentication to reset his password without contacting administrator. New temporary password will be shown online or sent to email box according to the web part configuration."
b.   Cost: $390 commercial license per WFE server; development license $149; 30-Day Trial

4.     HarePoint
i.            HarePoint ​Password C​hange for Microsoft SharePoint
a.   "HarePoint Password Change for Microsoft SharePoint 2007 / 2010 allows end-users to change their own password in a SharePoint site and notifies users wh​en their password is about to expire. Simply add the web part to your SharePoint intranet or extranet portal and let authorized users easily manage their own passwords."
b.   Cost $649 per server; Per user license also available $1.70/user; 30-Day Trial
c.    Comments: There doesn’t seem to be a product for resetting passwords if expired or forgotten.

5.     ArtfulBits
i.            Password Change Web Part Version 1.0
a.   "ArtfulBits Password Change Web Part allows users to change their own passwords from within the SharePoint environment using standard text box interface (current password, new password and confirm new password). It supports Windows authentication and Forms-based which includes Active Directory (AD), Lightweight Directory Access Protocol (LDAP), SQL and other authentication providers."
b.   Cost: $200 per server; 30-Day Trial

ii.           Password Expiration Web Part Version 1.01
a.   "ArtfulBits Password Expiration Web Part enables notification of Active Directory users through the Web Part user interface along with a link to a web page to change their password and/or an email that is automatically sent to their inbox notifying the user that their password is about to expire within a specified grace period. Administrators also have an option to force the users to be automatically redirected to selected web page in order to change their passwords."
b.   Cost: $300 per server; 30-Day Trial

iii.          Password Reset Web Part Version 1.01
a.   "ArtfulBits Password Reset Web Part allows users to reset their forgotten passwords from within the SharePoint environment without administrator intervention. If user does not remember his password and wants to log in SharePoint site, he can reset his forgotten password via web part interface, passing through the various degrees of protection, included security questions and / or email confirmation. New password can be shown on page, or sent to user email, or even user can type new password manually."
b.   Cost: $200 per server; 30-Day Trial

 6.     The Dot Not Factory
i.            AD Password
a.   "AD Password is the only solution allowing end-users to reset forgotten Active Directory and AD LDS (ADAM) passwords and unlock their locked-out accounts while seamlessly integrating into your existing environment. AD Password offers multiple interfaces allowing users to change their passwords or enroll in the Password Reset Service from Microsoft SharePoint, a standard web interface and the Windows logon dialog. AD Password is a flexible solution that eliminates the source of the number one help desk call -- password resets."
b.   Cost: per user commercial license only starting with 50 users for $350; 15-Day Trial
c.   Not limited to just SharePoint 

If Password Change is the only functionality that you require, the following are two are free options:
o   "This web part enables users to change their local or Active Directory password from within a SharePoint Site Collection. It is designed for Windows SharePoint Services v3 and the Microsoft Office SharePoint Server 2007 as well."
o   Cost: Free
o   Comments: Apparently this can be successfully installed on SP2010 and is documented here: Add Change Password Web Part to SCSM 2012 Self Service Portal (SharePoint 2010)

·       SDS SharePoint Library
o   Active Directory Password Change
·       "Have remote users? Tired of logging into Outlook Web Access for password changes? This web part allows users to change their passwords."
·       Cost: Free; must compile

Finally, if you prefer, you can build it yourself. Here’s a blog entry by a Share Point Consultant and Architect based out of Chennai, India to get you started: ChangePassword Web Part for SharePoint 2010.